
The story of Electron begins with Github’s open source code editor Atom. The goal was to build a desktop application with web technology. Github started looking for the right tool to build it. They tried Chrome Embedded Framework (CEF) and Node WebKit (nw.js) but soon realized they are gonna need something more specific. After drilling-down Github hired Cheng Zhao who was electron’s lead developer on Atom’s team. The project got open sourced in May 2014 and was renamed to Electron in April 2015.
What is it?
It’s a platform for building cross-platform desktop applications with web technologies. With electron, you can build your desktop application with HTML, CSS, and JavaScript. You can target all three platforms (Linux, windows, mac) with one code base. Electron ships with Chrome’s content library and Node. So you can use all the latest features of web browsers and Node ecosystem. It got popular after many companies and open source devs started developing their apps with it.
In this tutorial, we’ll be building Hacker News cross-platform desktop app. We’ll be using HN official API. HN API is currently read-only so we’ll only be able to read and view stories and comments.
Setting up Development Environment
Since we will be using React and ES6, we need to transpile our code before using it in our electron app. After all, it’s Chromium which is responsible for frontend rendering and javascript execution. Just like browsers, electron can’t understand React’s JSX and CSS Preprocessors syntax. We’ll be using webpack to transform ES6 and JSX with babel along with all the necessary loaders required to transform SCSS into CSS.
Let’s start by creating a package.json file. Add some dependencies and boilerplate configuration to it.
|
1 2 3 4 5 6 7 8 9 10 11 12 13 14 15 16 17 18 19 20 21 22 23 24 25 26 27 28 29 30 31 32 33 34 35 36 37 38 39 40 41 42 43 44 45 46 47 48 49 50 51 52 53 54 55 56 57 58 59 60 61 62 63 64 65 66 67 |
{ "name": "electron-react", "version": "1.0.0", "description": "HackerNews Desktop App", "main": "./app/build/app.js", "scripts": { "dev": "concurrently \"cross-env NODE_ENV=development webpack-dev-server --config webpack/dev.config.js\" \"cross-env NODE_ENV=development electron ./app/src/main/app.js\"", "prod": "cross-env NODE_ENV=production webpack --progress --color --config webpack/prod.config.js", "start": "npm run prod && electron app/build/app.js", "pack": "electron-builder --dir", "dist": "npm run prod && electron-builder", "postinstall": "electron-builder install-app-deps" }, "author": "Waleed Ahmad", "license": "MIT", "build": { "productName": "HackerNews Desktop", "win": { "target": "NSIS" }, "linux": { "target": [ "deb", "AppImage" ] }, "mac": { "category": "public.app-category.developer-tools" }, "directories": { "output": "release" } }, "devDependencies": { "babel-core": "^6.26.3", "babel-loader": "^7.1.4", "babel-minify-webpack-plugin": "^0.2.0", "babel-preset-es2015": "^6.24.1", "babel-preset-react": "^6.24.1", "babel-preset-stage-1": "^6.24.1", "concurrently": "^3.5.0", "copy-webpack-plugin": "^4.0.1", "cross-env": "^5.0.5", "css-loader": "^0.28.7", "electron": "^1.7.6", "electron-builder": "^19.27.7", "electron-devtools-installer": "^2.2.0", "extract-text-webpack-plugin": "^3.0.0", "file-loader": "^0.11.2", "node-sass": "^4.5.3", "react-hot-loader": "^3.0.0-beta.6", "sass-loader": "^6.0.6", "style-loader": "^0.18.2", "webpack": "^3.5.6", "webpack-dev-server": "^2.7.1", "webpack-node-externals": "^1.6.0" }, "dependencies": { "axios": "^0.18.0", "bootstrap": "^4.1.1", "react": "^16.3.2", "react-dom": "^16.3.2", "react-electron-web-view": "^2.0.1", "react-electron-webview": "^2.0.2", "react-spinners": "^0.3.2" } } |
We’ll be using three separate run commands to build and run our code. After scripts, we have separate configuration for Linux, Mac, and Windows. electron-builder will be using this configuration to generate distributable packages. In our devDependencies, all the babel-* packages will be used for ES6 and JSX transformation. We’re using concurrently package in our dev command to build code Webpack, run a development server and electron app. We’ll be using axios for network requests to HackerNews API.
Application Structure
The following structure will be used in our app.
|
1 2 3 4 5 6 7 8 9 10 11 12 13 14 15 16 |
/app /build /src /main /components /res app.js // electron bootstrap code index.html // electron app view file /node_modules /release /webpack dev.config.js prod.config.js .babelrc .packagejson [...] // other git and lock files |
Webpack Configuration
We’ll be using two separate configurations for building our app code. Development configuration will take care of transpilation, running webpack-dev-server and hot-reloading.
|
1 2 3 4 5 6 7 8 9 10 11 12 13 14 15 16 17 18 19 20 21 22 23 24 25 26 27 28 29 30 31 32 33 34 35 36 37 38 39 40 41 42 43 44 45 46 47 48 49 50 51 52 53 54 55 56 57 58 59 |
const webpack = require('webpack'); const path = require('path'); const CopyWebpackPlugin = require('copy-webpack-plugin'); module.exports = { context: path.join(__dirname, '../app'), devtool: 'inline-source-map', entry: { app: [ 'react-hot-loader/patch', 'webpack-dev-server/client?http://localhost:9000', 'webpack/hot/only-dev-server', './src/main/components/index.js', ], }, output: { path: path.resolve(__dirname, './app/build'), filename: 'app.bundle.js', publicPath: 'http://localhost:9000/', }, devServer: { hot: true, publicPath: 'http://localhost:9000/', historyApiFallback: true, port: 9000, }, module: { rules: [{ test: /\.js$/, exclude: /node_modules/, use: { loader: 'babel-loader', }, }, { test: /\.scss$/, use: ['style-loader', 'css-loader', 'sass-loader'], }, { test: /\.(png|jpg|gif)$/, use: [{ loader: 'file-loader', options: {}, }], }, ], }, plugins: [ new webpack.HotModuleReplacementPlugin(), new webpack.NamedModulesPlugin(), new CopyWebpackPlugin([{ from: './src/main/app.js', }, { from: './src/main/index.html', }, ]), ], }; |
Our production config will take care of transpilation and output all necessary files to build folder for electron-builder.
|
1 2 3 4 5 6 7 8 9 10 11 12 13 14 15 16 17 18 19 20 21 22 23 24 25 26 27 28 29 30 31 32 33 34 35 36 37 38 39 40 41 42 43 44 45 46 47 48 49 50 51 52 53 54 55 56 57 58 59 60 61 62 63 64 65 66 67 |
const webpack = require('webpack'); const path = require('path'); const ExtractTextPlugin = require('extract-text-webpack-plugin'); const MinifyPlugin = require('babel-minify-webpack-plugin'); const CopyWebpackPlugin = require('copy-webpack-plugin'); module.exports = { context: path.join(__dirname, '../app'), devtool: 'source-map', entry: { app: [ './src/main/components/index.js', ], }, output: { path: path.resolve(__dirname, '../app/build'), filename: 'app.bundle.js', }, module: { rules: [{ test: /\.js$/, exclude: /node_modules/, use: { loader: 'babel-loader', }, }, { test: /\.scss$/, use: ExtractTextPlugin.extract({ fallback: 'style-loader', use: ['css-loader', 'sass-loader'], }), }, { test: /\.(png|jpg|gif)$/, use: [{ loader: 'file-loader', options: { outputPath: 'images/', }, }], }, ], }, plugins: [ new webpack.DefinePlugin({ 'process.env': { NODE_ENV: JSON.stringify('production'), }, }), new webpack.optimize.ModuleConcatenationPlugin(), new webpack.optimize.AggressiveMergingPlugin(), new webpack.optimize.OccurrenceOrderPlugin(), new MinifyPlugin(), new ExtractTextPlugin('css/main.css'), new CopyWebpackPlugin([ { from: './src/main/app.js', to: path.join(__dirname, '../app/build'), }, { from: './src/main/index.html', to: path.join(__dirname, '../app/build'), }, ]), ], }; |
Electron Configuration
Our electron main code resides in app/src/main/app.js. We’ll launch a BrowserWindow from this file and serve app/src/main/index.html file. In createWindow() method, we are creating a new Instance of BrowserWindow
|
1 2 3 4 5 6 7 8 9 10 11 12 13 14 15 |
let screenSize = electron.screen.getPrimaryDisplay().size; mainWindow = new BrowserWindow({ width: screenSize.width - 200, height: screenSize.height - 200, 'minHeight': 700, 'minWidth': 1000, icon: './res/images/logo.ico' }); mainWindow.setMenu(null); mainWindow.loadURL(url.format({ pathname: path.join(__dirname, 'index.html'), protocol: 'file:', slashes: true, })); |
In index.html view, we’re bootstrapping our react app with dynamically generated style and script tags according to the environment. For the development environment, we’re using webpack-dev-server.js script serverd through webpack-dev-server. For the production environment, we’re serving webpack’s bundled js css scripts.
|
1 2 3 4 5 6 7 8 9 10 11 12 13 14 15 16 17 18 19 20 21 22 23 24 25 26 27 28 29 30 31 32 33 34 35 36 37 38 39 40 41 42 43 44 45 46 47 |
<!DOCTYPE html> <html lang="en"> <head> <!-- Required meta tags always come first --> <meta charset="utf-8"> <meta name="viewport" content="width=device-width, initial-scale=1, shrink-to-fit=no"> <meta http-equiv="x-ua-compatible" content="ie=edge"> <title>Hacker News App</title> </head> <body> <div id="reactbody" class="h-100"></div> <script> { if (process.env.NODE_ENV) { const bundle = document.createElement('script'); const port = 9000; bundle.src = 'http://localhost:' + port + '/app.bundle.js'; document.body.appendChild(bundle); const devServer = document.createElement('script'); devServer.src = 'http://localhost:' + port + '/webpack-dev-server.js'; document.body.appendChild(devServer); } else { let headHTML = document.getElementsByTagName('head')[0].innerHTML; headHTML += '<link type="text/css" rel="stylesheet" href="css/main.css">'; document.getElementsByTagName('head')[0].innerHTML = headHTML; const bundle = document.createElement('script'); bundle.src = 'app.bundle.js'; document.body.appendChild(bundle); } } </script> <script> if (typeof module === 'object') { window.module = module; module = undefined; } </script> <script> if (window.module) module = window.module; </script> </body> </html> |
Bootstrapping React
Now we’ll start writing React code. In app/src/main/components/index.js we’re rendering our application Root component.
|
1 2 3 4 5 6 7 8 9 10 11 12 |
import React from 'react'; import ReactDOM from 'react-dom'; import Root from './Root'; const render = (Component) => { ReactDOM.render( <Component />, document.getElementById('reactbody'), ); }; render(Root); |
Our Root component is responsible for rendering Sidebar and Story WebView . I’ll explain each method from the constructor to network requests and render data to our children components.
|
1 2 3 4 5 6 7 8 |
constructor(props){ super(props); this.state = { all_stories : [], loaded : [], active_story : '' } } |
We’re setting the initial state for our Root component in its constructor(). We’ll be using all_stories state for storing all top stories IDs from HN API. However, we won’t be rendering all of them to our sidebar component. Instead, we’ll only request first 20 stories from API and store them in loaded state. We’ll mark the story as active and update active_story state when a user clicks on any story in the sidebar.
We’re invoking getStories() method from componentDidMount() lifecycle method which requests stories from HN API and update all_stories state. After making sure the state is updated, we’re calling loadStories() method with starting and ending index.
|
1 2 3 4 5 6 7 8 9 10 11 12 13 |
getStories(){ axios.get(API.GET_STORIES) .then(function (res) { this.setState({ all_stories : res.data }, () => { this.loadStories(this.state.loaded.length, this.state.loaded.length + 20) }); }.bind(this)) .catch(function (err) { console.log(err); }); } |
|
1 2 3 4 5 6 7 8 9 10 11 12 13 14 15 16 17 18 19 20 21 22 23 |
loadStories(startIndex, endIndex){ const load_stories = this.state.all_stories.slice(startIndex, endIndex); const url_promises = load_stories.map(story => { return axios.get(API.STORY + story + '.json?print=pretty') }); axios.all(url_promises).then(function(results) { const clean_results = results.filter(r => { r.data.active = false; return r.data.url; }); this.setState({ loaded: this.state.loaded.concat(clean_results.map(r => { return r.data; })) }, () => { if(!startIndex){ this.updateStory(this.state.loaded[0].id) } }); }.bind(this)); } |
In loadStories() method, we’re passing url_promises to axios.all() method. By using all() method, we’re making sure that state updates after all requests are done. This way we’ll only have to update state once from multiple network calls. After that, we’re adding loaded stories to loaded state. After updating state, we’re marking the first story as active on initial render.
|
1 2 3 4 5 6 7 8 9 10 11 12 13 14 15 16 17 18 |
updateStory(id){ this.state.loaded.filter(story => { if(story.id === id){ this.setState({ active_story: story.url }); } }); this.state.loaded.map(function(story){ const index = this.state.loaded.indexOf(story); const clone_loaded = [...this.state.loaded]; clone_loaded[index].active = story.active ? story.id === id : !story.active ? story.id === id : true; this.setState({ loaded : clone_loaded }); }.bind(this)); } |
We’re marking stories as active when a user clicks on a sidebar story and unmark those that were marked previously.
|
1 2 3 4 5 6 7 8 9 10 11 12 13 14 15 16 |
render(){ return( <div className="container-fluid h-100"> <div className="row h-100"> <Sidebar stories={this.state.loaded} loadMoreStories={this.loadMoreStories.bind(this)} loadStory={this.updateStory.bind(this)} /> <Story url={this.state.active_story} /> </div> </div> ) } |
In our render method, we’re rendering Sidebar and Story Components. We’re passing stories down to our Sidebar along with callbacks for loading more stories and loadStory. We’re passing url to our Story component which is responsible for rendering electron’s webview.
|
1 2 3 4 5 6 7 8 9 10 11 12 13 14 15 16 17 18 19 20 21 22 23 24 25 26 27 28 29 30 31 32 33 34 35 36 37 38 39 |
class Sidebar extends React.Component{ constructor(props){ super(props); this.state = { stories : this.props.stories } } componentWillReceiveProps(nextProps){ this.setState({ stories : nextProps.stories }); } onClickHandler(id, e){ this.props.loadStory(id); } render(){ return ( <div className="sidebar col-md-4 col-lg-3"> { this.state.stories ? this.state.stories.map(function(story){ return ( <div className={"link " + (story.active ? 'active' : '')} key={story.id} onClick={this.onClickHandler.bind(this, story.id)} >{story.title}</div> ) }.bind(this)) : 'Loading stories' } <a className="load-more" onClick={this.props.loadMoreStories.bind(this)}> Load More Stories </a> </div> ) } } |
In our Sidebar component, we’re rendering divs with story title and registering onClick handlers for loading story in webview. We’re also registering an onClick handler for loading more stories at the end of our stories list.
|
1 2 3 4 5 6 7 8 9 10 11 12 13 14 15 16 17 18 19 20 21 22 23 24 25 26 27 28 29 30 31 32 33 34 35 36 37 38 39 40 41 42 43 44 45 46 47 48 49 |
class Story extends React.Component{ constructor(props){ super(props); this.state = { url : props.url, display : 'none', }; } componentWillReceiveProps(nextProps){ this.setState({ url : nextProps.url, display : 'none' }); if(nextProps.url){ setTimeout(() => { this.setState({ display : 'block' }); }, 4000) } } render(){ return ( <div className="story col-md-8 col-lg-9 h-100"> { this.state.display === 'block' ? <WebView className="web-view" src={this.state.url} style={{ 'height' : '100%', 'width' : '100%', 'display' : this.state.display }} /> : <div className="spinner-icon"> <ScaleLoader color={'#000'} loading={true} /> </div> } </div> ) } } |
In our Story component, we’re initially rendering a ScaleLoader. When the component receives a new url prop, we render a WebView with it after waiting 4 secs of loading. After applying few styles to our sidebar and story components, our app is ready for display.

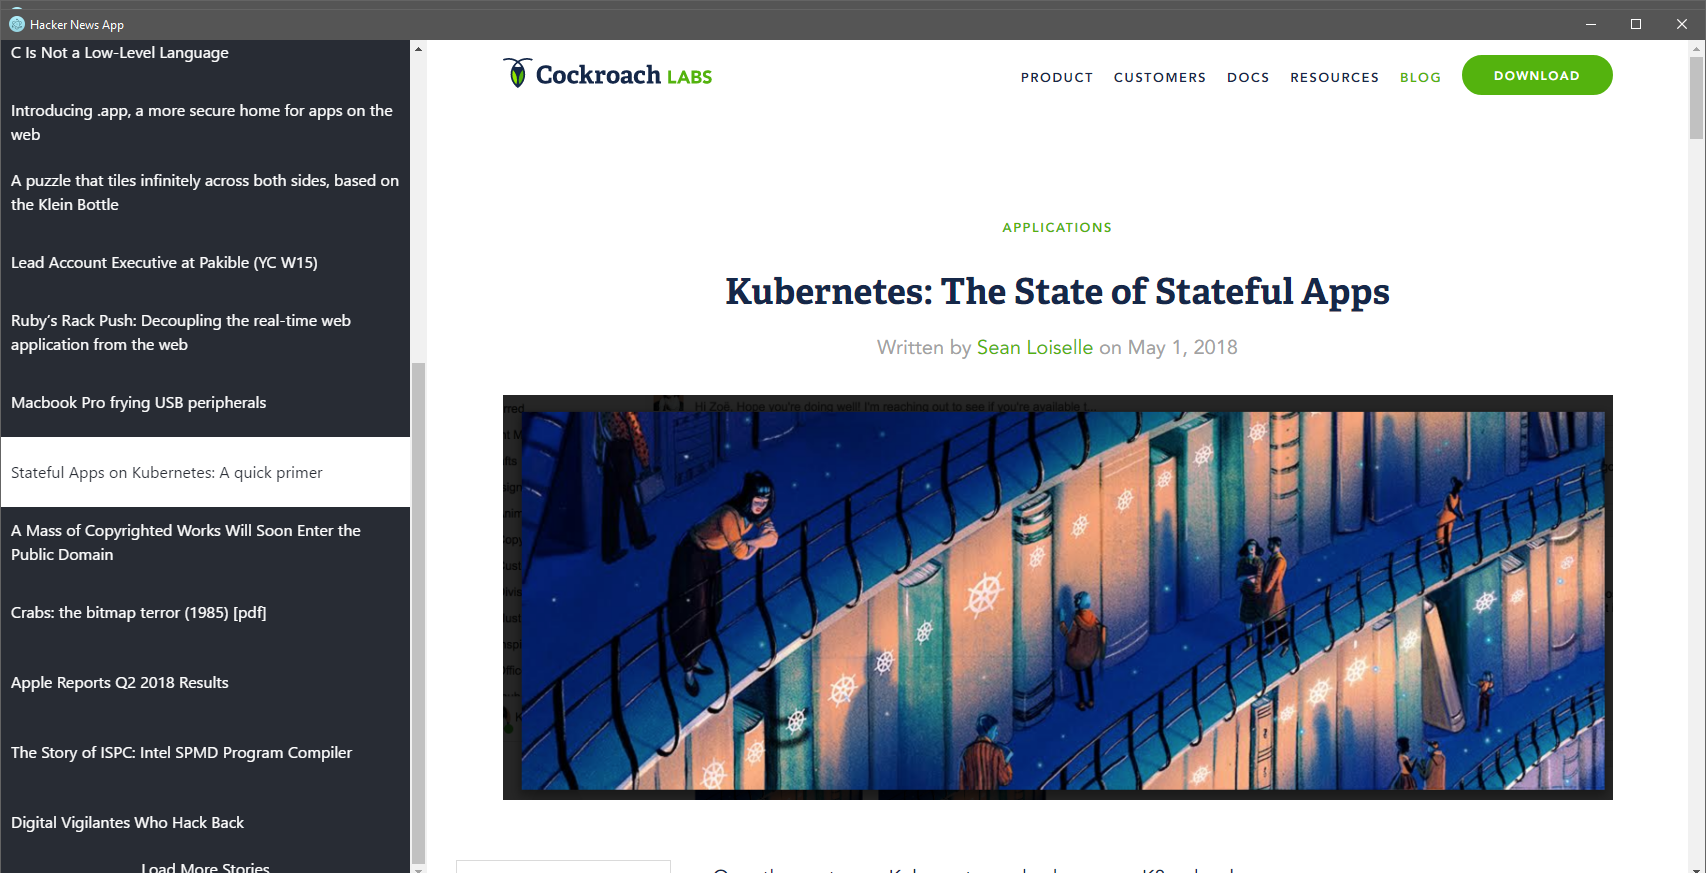
Building and Distribution
By running npm run dev you’ll set up a dev environment. It will set up all the necessary tools required for you to build your react desktop app. By running npm run watch , you’ll be able to build and run your app without development tools. To generate a distributable package and installer, you need to run npm run dist. It will generate a distributable binary and installer for your application.
I’ve set up a GitHub example repository. You can clone and dive into code right away. If you’ve any questions or problems, leave a comment and i’ll try to help you.