I’ve been working on an app which lets you live stream your desktop. It takes in an RTMP stream from the broadcaster and transcodes it into HLS stream that viewers can watch in their web browsers. In this tutorial, I’ll show how you can build your own video streaming app with Nodejs. If you are ‘I want to directly dive into code’ kind of person, I’ve created this repository for you with setup instructions. I am going to break down this tutorial into five parts.
- Web Server with Basic authentication
- Setting up an RTMP server in Nodejs
- Displaying live streams
- Issuing streaming keys to broadcasters
- Generating live stream thumbnails
Web Server with Basic Authentication
Let’s set up a basic node server with passport local strategy authentication. We will use MongoDB with Mongoose ODM for persistent storage. Initialize a new project by running
|
1 |
$ npm init |
and install these dependencies.
|
1 2 3 4 |
$ npm install axios bcrypt-nodejs body-parser bootstrap config connect-ensure-login connect-flash cookie-parser ejs express express-session mongoose passport passport-local request session-file-store --save-dev |
In your project directory, create two folders client and server. We will place our react components inside the client directory and backend code in the server directory. For this part, we will be working inside the server directory. We are using passport.js for authentication. We have already installed passport and passport-local modules. Before we define our local strategy for authenticating users, let’s create an app.js file and add the necessary code to run a basic web server. Make sure you have MongoDB installed on your system and running as a service.
|
1 2 3 4 5 6 7 8 9 10 11 12 13 14 15 16 17 18 19 20 21 22 23 24 25 26 27 28 29 30 31 32 33 34 |
const express = require('express'), Session = require('express-session'), bodyParse = require('body-parser'), mongoose = require('mongoose'), middleware = require('connect-ensure-login'), FileStore = require('session-file-store')(Session), config = require('./config/default'), flash = require('connect-flash'), port = 3333, app = express(); mongoose.connect('mongodb://127.0.0.1/nodeStream' , { useNewUrlParser: true }); app.set('view engine', 'ejs'); app.set('views', path.join(__dirname, './views')); app.use(express.static('public')); app.use(flash()); app.use(require('cookie-parser')()); app.use(bodyParse.urlencoded({extended: true})); app.use(bodyParse.json({extended: true})); app.use(Session({ store: new FileStore({ path : './server/sessions' }), secret: config.server.secret, maxAge : Date().now + (60 * 1000 * 30) })); app.get('*', middleware.ensureLoggedIn(), (req, res) => { res.render('index'); }); app.listen(port, () => console.log(`App listening on ${port}!`)); |
We have bootstrapped all the necessary middlewares for our application, connected to MongoDB and configured express session to use the file storage for session persistence in case of the web server restart. Now we will define our passport strategies for registering and authenticating users. Create a folder named auth with a passport.js file in it and add the following code.
|
1 2 3 4 5 6 7 8 9 10 11 12 13 14 15 16 17 18 19 20 21 22 23 24 25 26 27 28 29 30 31 32 33 34 35 36 37 38 39 40 41 42 43 44 45 46 47 48 49 50 51 52 53 54 55 56 57 58 59 60 61 62 63 64 65 66 67 68 69 70 71 |
const passport = require('passport'), LocalStrategy = require('passport-local').Strategy, User = require('../database/Schema').User, shortid = require('shortid'); passport.serializeUser( (user, cb) => { cb(null, user); }); passport.deserializeUser( (obj, cb) => { cb(null, obj); }); // Passport strategy for handling user registration passport.use('localRegister', new LocalStrategy({ usernameField: 'email', passwordField: 'password', passReqToCallback: true }, (req, email, password, done) => { User.findOne({$or: [{email: email}, {username: req.body.username}]}, (err, user) => { if (err) return done(err); if (user) { if (user.email === email) { req.flash('email', 'Email is already taken'); } if (user.username === req.body.username) { req.flash('username', 'Username is already taken'); } return done(null, false); } else { let user = new User(); user.email = email; user.password = user.generateHash(password); user.username = req.body.username; user.stream_key = shortid.generate(); user.save( (err) => { if (err) throw err; return done(null, user); }); } }); })); // Passport strategy for authenticating users passport.use('localLogin', new LocalStrategy({ usernameField: 'email', passwordField: 'password', passReqToCallback: true }, (req, email, password, done) => { User.findOne({'email': email}, (err, user) => { if (err) return done(err); if (!user) return done(null, false, req.flash('email', 'Email doesn\'t exist.')); if (!user.validPassword(password)) return done(null, false, req.flash('password', 'Oops! Wrong password.')); return done(null, user); }); })); module.exports = passport; |
We also need to define the schema for our User model. Create a database directory with UserSchema.js file in it and add the following code.
|
1 2 3 4 5 6 7 8 9 10 11 12 13 14 15 16 17 18 19 20 21 22 23 24 25 26 |
let mongoose = require('mongoose'), bcrypt = require('bcrypt-nodejs'), shortid = require('shortid'), Schema = mongoose.Schema; let UserSchema = new Schema({ username: String, email : String, password: String, stream_key : String, }); UserSchema.methods.generateHash = (password) => { return bcrypt.hashSync(password, bcrypt.genSaltSync(8), null); }; UserSchema.methods.validPassword = function(password){ return bcrypt.compareSync(password, this.password); }; UserSchema.methods.generateStreamKey = () => { return shortid.generate(); }; module.exports = UserSchema; |
We have three methods on our User schema. generateHash method will convert plain text password to bcrypt hash. We are using it in our passport strategy for converting plain password strings to bcrypt hash before storing them in the database. validPassword method will take in a plain text password and validate it by comparing it to bcrypt hash stored in our database. generateStreamKey method will generate a unique string that we will issue to users as their streaming key for RTMP clients.
|
1 2 3 |
let mongoose = require('mongoose'); exports.User = mongoose.model('User', require('./UserSchema')); |
Now that we have defined our passport strategies, added user schema and created a model from it, let’s initialize passport in app.js.
|
1 2 3 4 5 |
// Add on the top next to imports const passport = require('./auth/passport'); app.use(passport.initialize()); app.use(passport.session()); |
Also, register these routes in the app.js file.
|
1 2 3 4 |
// Register app routes app.use('/login', require('./routes/login')); app.use('/register', require('./routes/register')); |
Create a login.js and register.js file under routes directory where we will define these routes and use passport middleware for registration and authentication.
|
1 2 3 4 5 6 7 8 9 10 11 12 13 14 15 16 17 18 19 20 21 22 23 |
const express = require('express'), router = express.Router(), passport = require('passport'); router.get('/', require('connect-ensure-login').ensureLoggedOut(), (req, res) => { res.render('login', { user : null, errors : { email : req.flash('email'), password : req.flash('password') } }); }); router.post('/', passport.authenticate('localLogin', { successRedirect : '/', failureRedirect : '/login', failureFlash : true })); module.exports = router; |
|
1 2 3 4 5 6 7 8 9 10 11 12 13 14 15 16 17 18 19 20 21 22 23 24 25 26 27 |
const express = require('express'), router = express.Router(), passport = require('passport'); router.get('/', require('connect-ensure-login').ensureLoggedOut(), (req, res) => { res.render('register', { user : null, errors : { username : req.flash('username'), email : req.flash('email') } }); }); router.post('/', require('connect-ensure-login').ensureLoggedOut(), passport.authenticate('localRegister', { successRedirect : '/', failureRedirect : '/register', failureFlash : true }) ); module.exports = router; |
We are using ejs templating engine. Add login.ejs and register.ejs template to views directory and add the following code.
|
1 2 3 4 5 6 7 8 9 10 11 12 13 14 15 16 17 18 19 20 21 22 23 24 25 26 27 28 29 30 31 32 33 34 35 36 37 38 39 |
<!doctype html> <html lang="en"> <% include header.ejs %> <body> <% include navbar.ejs %> <div class="container app mt-5"> <h4>Login</h4> <hr class="my-4"> <div class="row"> <form action="/login" method="post" class="col-xs-12 col-sm-12 col-md-8 col-lg-6"> <div class="form-group"> <label>Email address</label> <input type="email" name="email" class="form-control" placeholder="Enter email" required> <% if (errors.email.length) { %> <small class="form-text text-danger"><%= errors.email %></small> <% } %> </div> <div class="form-group"> <label>Password</label> <input type="password" name="password" class="form-control" placeholder="Password" required> <% if (errors.password.length) { %> <small class="form-text text-danger"><%= errors.password %></small> <% } %> </div> <div class="form-group"> <div class="leader"> Don't have an account? Register <a href="/register">here</a>. </div> </div> <button type="submit" class="btn btn-dark btn-block">Login</button> </form> </div> </div> <% include footer.ejs %> </body> </html> |
|
1 2 3 4 5 6 7 8 9 10 11 12 13 14 15 16 17 18 19 20 21 22 23 24 25 26 27 28 29 30 31 32 33 34 35 36 37 38 39 40 41 42 43 44 45 46 47 48 49 50 51 |
<!doctype html> <html lang="en"> <% include header.ejs %> <body> <% include navbar.ejs %> <div class="container app mt-5"> <h4>Register</h4> <hr class="my-4"> <div class="row"> <form action="/register" method="post" class="col-xs-12 col-sm-12 col-md-8 col-lg-6"> <div class="form-group"> <label>Username</label> <input type="text" name="username" class="form-control" placeholder="Enter username" required> <% if (errors.username.length) { %> <small class="form-text text-danger"><%= errors.username %></small> <% } %> </div> <div class="form-group"> <label>Email address</label> <input type="email" name="email" class="form-control" placeholder="Enter email" required> <% if (errors.email.length) { %> <small class="form-text text-danger"><%= errors.email %></small> <% } %> </div> <div class="form-group"> <label>Password</label> <input type="password" name="password" class="form-control" placeholder="Password" required> </div> <div class="form-group"> <div class="leader"> Have an account? Login <a href="/login">here</a>. </div> </div> <button type="submit" class="btn btn-dark btn-block">Register</button> </form> </div> </div> <% include footer.ejs %> </body> </html> |
We are pretty much done with authentication. Now we will move onto the next part of this tutorial and set up our RTMP server.
Setting up an RTMP server
Real-Time Messaging Protocol (RTMP) was designed for high-performance transmission of video, audio, and data between broadcaster and server. Twitch, Facebook, Youtube, and many other sites who offer live streaming accepts RTMP streams and transcodes then into HTTP streams (HLS format) before distributing them to their CDNs for high availability.
We are using node-media-server, a Node.js implementation of RTMP media server. It accepts RTMP streams and remux them to HLS/DASH using ffmpeg. Make sure you have ffmpeg installed on your system. If you are running Linux and already have ffmpeg installed, you can find your installation path by running this command from the terminal.
|
1 2 |
$ which ffmpeg # /usr/bin/ffmpeg |
node-media-server recommends ffmpeg 4.x version. You can check your version by running this command.
|
1 2 3 |
$ ffmpeg --version # ffmpeg version 4.1.3-0york1~18.04 Copyright (c) 2000-2019 the # FFmpeg developers built with gcc 7 (Ubuntu 7.3.0-27ubuntu1~18.04) |
If you don’t have ffmpeg installed and running Ubuntu, you can install it by running these commands from the terminal.
|
1 2 3 4 5 |
# Add PPA. If you install without PPA, it will install # ffmpeg version 3.x. $ sudo add-apt-repository ppa:jonathonf/ffmpeg-4 $ sudo apt install ffmpeg |
If you are running Windows, you can download ffmpeg windows builds. Add this config file to your project.
|
1 2 3 4 5 6 7 8 9 10 11 12 13 14 15 16 17 18 19 20 21 22 23 24 25 26 27 28 29 30 31 32 33 |
const config = { server: { secret: 'kjVkuti2xAyF3JGCzSZTk0YWM5JhI9mgQW4rytXc' }, rtmp_server: { rtmp: { port: 1935, chunk_size: 60000, gop_cache: true, ping: 60, ping_timeout: 30 }, http: { port: 8888, mediaroot: './server/media', allow_origin: '*' }, trans: { ffmpeg: '/usr/bin/ffmpeg', tasks: [ { app: 'live', hls: true, hlsFlags: '[hls_time=2:hls_list_size=3:hls_flags=delete_segments]', dash: true, dashFlags: '[f=dash:window_size=3:extra_window_size=5]' } ] } } }; module.exports = config; |
Change ffmpeg value to your own ffmpeg installation path. If you’re running windows and downloaded Windows builds from the above link, make sure you add .exe extension add the end of your path.
|
1 2 3 4 5 6 7 8 |
const config = { .... trans: { ffmpeg: 'D:/ffmpeg/bin/ffmpeg.exe', ... } } }; |
Also, install node-media-server by running
|
1 |
$ npm install node-media-server --save |
Create media_server.js file and add this code.
|
1 2 3 4 5 6 7 8 9 10 11 12 13 14 15 16 |
const NodeMediaServer = require('node-media-server'), config = require('./config/default').rtmp_server; nms = new NodeMediaServer(config); nms.on('prePublish', async (id, StreamPath, args) => { let stream_key = getStreamKeyFromStreamPath(StreamPath); console.log('[NodeEvent on prePublish]', `id=${id} StreamPath=${StreamPath} args=${JSON.stringify(args)}`); }); const getStreamKeyFromStreamPath = (path) => { let parts = path.split('/'); return parts[parts.length - 1]; }; module.exports = nms; |
NodeMediaServer usage is pretty straight forward. It runs an RTMP server and lets you listen to connection events. You can reject an incoming connection if a streaming key is invalid. We will be listening to its prePublish event. We will add more code inside prePublish event listener closure to reject incoming connections with invalid streaming keys in the next part of this tutorial. For now, we are accepting all incoming connection on default 1935 RTMP port. Now, all we have to do is import nms object in the app.js file and call its run method.
|
1 2 3 4 5 6 7 8 |
// Add this on the top of app.js file // next to all imports const node_media_server = require('./media_server'); // and call run() method at the end // file where we start our web server node_media_server.run(); |
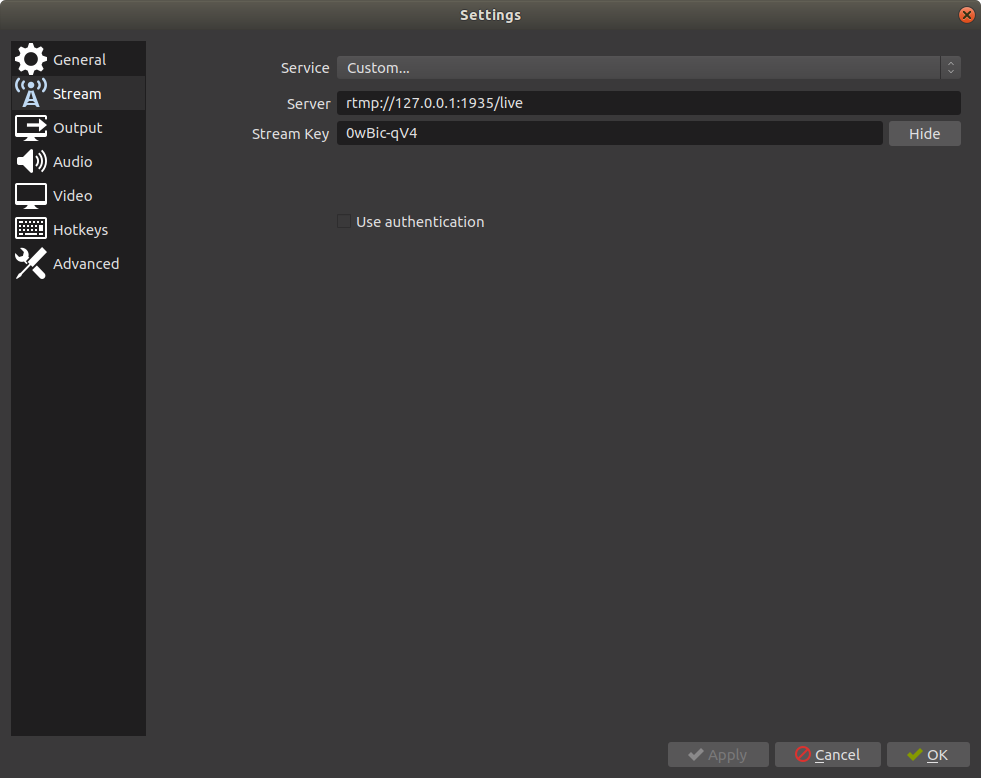
Download Open Broadcaster Software (OBS) and install it on your PC. Go to Settings > Stream. Select Custom service and enter rtmp://127.0.0.1:1935/live in Server input. You can leave Stream Key input empty or add a random string if it doesn’t let you save settings. Click Apply and Ok. Click start streaming button to broadcast your RTMP stream to your local server.
Head over to your terminal to see the output from your node media server. You will see an incoming stream with a few events listener logs.
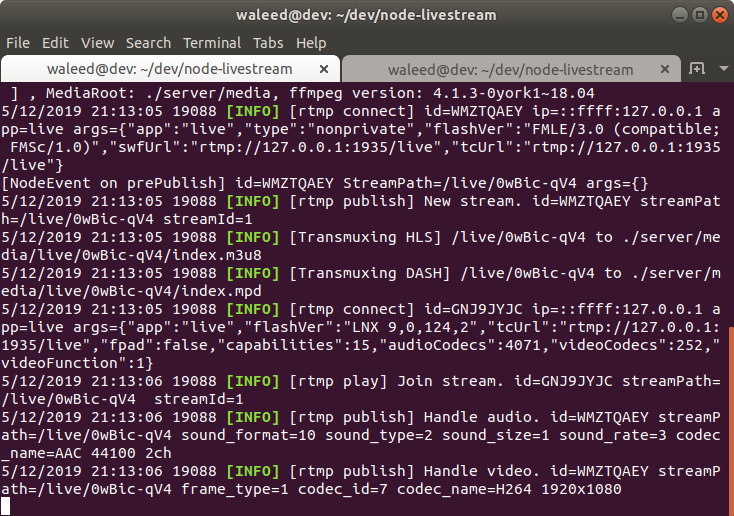
Node media server exposes an API to list all connected clients. You can access it in your browser at http://127.0.0.1:8888/api/streams. Later on, we will use this API in our frontend React app to show live streaming users. You will see an output like this.
|
1 2 3 4 5 6 7 8 9 10 11 12 13 14 15 16 17 18 19 20 21 22 23 24 25 26 27 28 29 30 31 32 33 34 35 36 37 38 39 |
{ "live": { "0wBic-qV4": { "publisher": { "app": "live", "stream": "0wBic-qV4", "clientId": "WMZTQAEY", "connectCreated": "2019-05-12T16:13:05.759Z", "bytes": 33941836, "ip": "::ffff:127.0.0.1", "audio": { "codec": "AAC", "profile": "LC", "samplerate": 44100, "channels": 2 }, "video": { "codec": "H264", "width": 1920, "height": 1080, "profile": "High", "level": 4.2, "fps": 60 } }, "subscribers": [ { "app": "live", "stream": "0wBic-qV4", "clientId": "GNJ9JYJC", "connectCreated": "2019-05-12T16:13:05.985Z", "bytes": 33979083, "ip": "::ffff:127.0.0.1", "protocol": "rtmp" } ] } } } |
Our backend is pretty much ready. Its a working HTTP/RTMP/HLS streaming server. However, we still need to validate incoming RTMP connections to ensure that only authenticated user’s streams are accepted. Add this code to your prePublish event listener closure.
|
1 2 3 4 5 6 7 8 9 10 11 12 13 14 15 16 17 18 19 20 21 22 23 |
// Add import at the start of file const User = require('./database/Schema').User; nms.on('prePublish', async (id, StreamPath, args) => { let stream_key = getStreamKeyFromStreamPath(StreamPath); console.log('[NodeEvent on prePublish]', `id=${id} StreamPath=${StreamPath} args=${JSON.stringify(args)}`); User.findOne({stream_key: stream_key}, (err, user) => { if (!err) { if (!user) { let session = nms.getSession(id); session.reject(); } else { // do stuff } } }); }); const getStreamKeyFromStreamPath = (path) => { let parts = path.split('/'); return parts[parts.length - 1]; }; |
Inside closure, we are querying the database to find a user with the streaming key. If it belongs to a user, we would simply let them connect and publish their stream. Otherwise, we reject the incoming RTMP connection.
In the next part of this tutorial, we will build a basic React frontend to allow users to view live streams, generate and view their streaming keys.
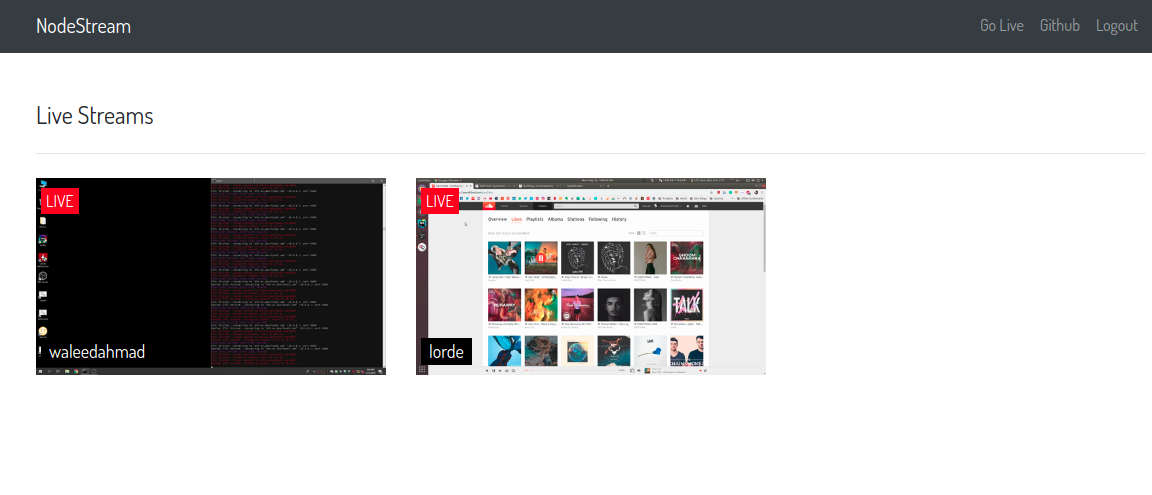
Displaying Live Streams
For this part, we will be working in the client directory. Since its a react app, we will be using webpack and necessary loaders to transpile JSX into browser ready JavaScript. Install these modules.
|
1 2 3 4 5 |
$ npm install @babel/core @babel/preset-env @babel/preset-react babel-loader css-loader file-loader mini-css-extract-plugin node-sass sass-loader style-loader url-loader webpack webpack-cli react react-dom react-router-dom video.js jquery bootstrap history popper.js |
Add this webpack config to your project.
|
1 2 3 4 5 6 7 8 9 10 11 12 13 14 15 16 17 18 19 20 21 22 23 24 25 26 27 28 29 30 31 32 33 34 35 36 37 38 39 40 41 42 43 44 45 46 47 48 49 50 51 52 53 54 55 56 57 58 |
const path = require('path'); const MiniCssExtractPlugin = require("mini-css-extract-plugin"); const devMode = process.env.NODE_ENV !== 'production'; const webpack = require('webpack'); module.exports = { entry : './client/index.js', output : { filename : 'bundle.js', path : path.resolve(__dirname, 'public') }, module : { rules : [ { test: /\.s?[ac]ss$/, use: [ MiniCssExtractPlugin.loader, { loader: 'css-loader', options: { url: false, sourceMap: true } }, { loader: 'sass-loader', options: { sourceMap: true } } ], }, { test: /\.js$/, exclude: /node_modules/, use: "babel-loader" }, { test: /\.woff($|\?)|\.woff2($|\?)|\.ttf($|\?)|\.eot($|\?)|\.svg($|\?)/, loader: 'url-loader' }, { test: /\.(png|jpg|gif)$/, use: [{ loader: 'file-loader', options: { outputPath: '/', }, }], }, ] }, devtool: 'source-map', plugins: [ new MiniCssExtractPlugin({ filename: "style.css" }), new webpack.ProvidePlugin({ $: 'jquery', jQuery: 'jquery' }) ], mode : devMode ? 'development' : 'production', watch : devMode, performance: { hints: process.env.NODE_ENV === 'production' ? "warning" : false }, }; |
Add an index.js file with the following code.
|
1 2 3 4 5 6 7 8 9 10 11 12 13 14 15 |
import React from "react"; import ReactDOM from 'react-dom'; import {BrowserRouter} from 'react-router-dom'; import 'bootstrap'; require('./index.scss'); import Root from './components/Root.js'; if(document.getElementById('root')){ ReactDOM.render( <BrowserRouter> <Root/> </BrowserRouter>, document.getElementById('root') ); } |
|
1 2 3 4 5 6 7 8 |
@import '~bootstrap/dist/css/bootstrap.css'; @import '~video.js/dist/video-js.css'; @import url('https://fonts.googleapis.com/css?family=Dosis'); html,body{ font-family: 'Dosis', sans-serif; } |
We are using react-router for routing and bootstrap on the frontend along with video.js for displaying live streams. Add components directory with Root.js file in it and add the following code.
|
1 2 3 4 5 6 7 8 9 10 11 12 13 14 15 16 17 18 19 20 21 22 23 24 25 26 27 28 29 30 31 32 33 34 35 36 |
import React from "react"; import {Router, Route} from 'react-router-dom'; import Navbar from './Navbar'; import LiveStreams from './LiveStreams'; import Settings from './Settings'; import VideoPlayer from './VideoPlayer'; const customHistory = require("history").createBrowserHistory(); export default class Root extends React.Component { constructor(props){ super(props); } render(){ return ( <Router history={customHistory} > <div> <Navbar/> <Route exact path="/" render={props => ( <LiveStreams {...props} /> )}/> <Route exact path="/stream/:username" render={(props) => ( <VideoPlayer {...props}/> )}/> <Route exact path="/settings" render={props => ( <Settings {...props} /> )}/> </div> </Router> ) } } |
<Root/> component renders a react <Router/> to hold three sub <Route/> components. <LiveStreams/> component will render all the live streams. <VideoPlayer/> will render video.js player components. <Settings/> component will provide an interface for generating a new streaming key.
Create LiveStreams.js component.
|
1 2 3 4 5 6 7 8 9 10 11 12 13 14 15 16 17 18 19 20 21 22 23 24 25 26 27 28 29 30 31 32 33 34 35 36 37 38 39 40 41 42 43 44 45 46 47 48 49 50 51 52 53 54 55 56 57 58 59 60 61 62 63 64 65 66 67 68 69 70 71 72 73 74 75 76 |
import React from 'react'; import axios from 'axios'; import {Link} from 'react-router-dom'; import './LiveStreams.scss'; import config from '../../server/config/default'; export default class Navbar extends React.Component { constructor(props) { super(props); this.state = { live_streams: [] } } componentDidMount() { this.getLiveStreams(); } getLiveStreams() { axios.get('http://127.0.0.1:' + config.rtmp_server.http.port + '/api/streams') .then(res => { let streams = res.data; if (typeof (streams['live'] !== 'undefined')) { this.getStreamsInfo(streams['live']); } }); } getStreamsInfo(live_streams) { axios.get('/streams/info', { params: { streams: live_streams } }).then(res => { this.setState({ live_streams: res.data }, () => { console.log(this.state); }); }); } render() { let streams = this.state.live_streams.map((stream, index) => { return ( <div className="stream col-xs-12 col-sm-12 col-md-3 col-lg-4" key={index}> <span className="live-label">LIVE</span> <Link to={'/stream/' + stream.username}> <div className="stream-thumbnail"> <img src={'/thumbnails/' + stream.stream_key + '.png'}/> </div> </Link> <span className="username"> <Link to={'/stream/' + stream.username}> {stream.username} </Link> </span> </div> ); }); return ( <div className="container mt-5"> <h4>Live Streams</h4> <hr className="my-4"/> <div className="streams row"> {streams} </div> </div> ) } } |
After our component mounts, we are making a call to NMS API to retrieve all the connected clients. NMS API does not have much information about the user other than their streaming key through which they are connected to our RTMP server. We will use the streaming key to query our database to get users records. In getStreamsInfo method, we are making an XHR request to /streams/info which we have not yet defined. Create a server/routes/streams.js file and add the following code to it. We will pass on the streams returned from the NMS API to our backend to retrieve information about connected clients.
|
1 2 3 4 5 6 7 8 9 10 11 12 13 14 15 16 17 18 19 20 21 22 23 24 25 26 |
const express = require('express'), router = express.Router(), User = require('../database/Schema').User; router.get('/info', require('connect-ensure-login').ensureLoggedIn(), (req, res) => { if(req.query.streams){ let streams = JSON.parse(req.query.streams); let query = {$or: []}; for (let stream in streams) { if (!streams.hasOwnProperty(stream)) continue; query.$or.push({stream_key : stream}); } User.find(query,(err, users) => { if (err) return; if (users) { res.json(users); } }); } }); module.exports = router; |
We are querying the database to select all the users with matched streaming keys that we retrieved from NMS API and return them as a JSON response. Register this route in the app.js file.
|
1 |
app.use('/streams', require('./routes/streams')); |
In the end, we are rendering live streams with username and thumbnails. We will generate thumbnails for our streams in the last part of this tutorial. These thumbnails are linked to the individual pages where HLS streams are played inside a video.js player component. Create VideoPlayer.js component.
|
1 2 3 4 5 6 7 8 9 10 11 12 13 14 15 16 17 18 19 20 21 22 23 24 25 26 27 28 29 30 31 32 33 34 35 36 37 38 39 40 41 42 43 44 45 46 47 48 49 50 51 52 53 54 55 56 57 58 59 60 61 62 63 |
import React from 'react'; import videojs from 'video.js' import axios from 'axios'; import config from '../../server/config/default'; export default class VideoPlayer extends React.Component { constructor(props) { super(props); this.state = { stream: false, videoJsOptions: null } } componentDidMount() { axios.get('/user', { params: { username: this.props.match.params.username } }).then(res => { this.setState({ stream: true, videoJsOptions: { autoplay: false, controls: true, sources: [{ src: 'http://127.0.0.1:' + config.rtmp_server.http.port + '/live/' + res.data.stream_key + '/index.m3u8', type: 'application/x-mpegURL' }], fluid: true, } }, () => { this.player = videojs(this.videoNode, this.state.videoJsOptions, function onPlayerReady() { console.log('onPlayerReady', this) }); }); }) } componentWillUnmount() { if (this.player) { this.player.dispose() } } render() { return ( <div className="row"> <div className="col-xs-12 col-sm-12 col-md-10 col-lg-8 mx-auto mt-5"> {this.state.stream ? ( <div data-vjs-player> <video ref={node => this.videoNode = node} className="video-js vjs-big-play-centered"/> </div> ) : ' Loading ... '} </div> </div> ) } } |
On component mount, we retrieve the user’s streaming key to initiate an HLS stream inside video.js player.
Issuing streaming keys to broadcasters
Create Settings.js component.
|
1 2 3 4 5 6 7 8 9 10 11 12 13 14 15 16 17 18 19 20 21 22 23 24 25 26 27 28 29 30 31 32 33 34 35 36 37 38 39 40 41 42 43 44 45 46 47 48 49 50 51 52 53 54 55 56 57 58 59 60 61 62 63 64 65 66 67 68 69 70 71 72 73 74 75 76 77 78 |
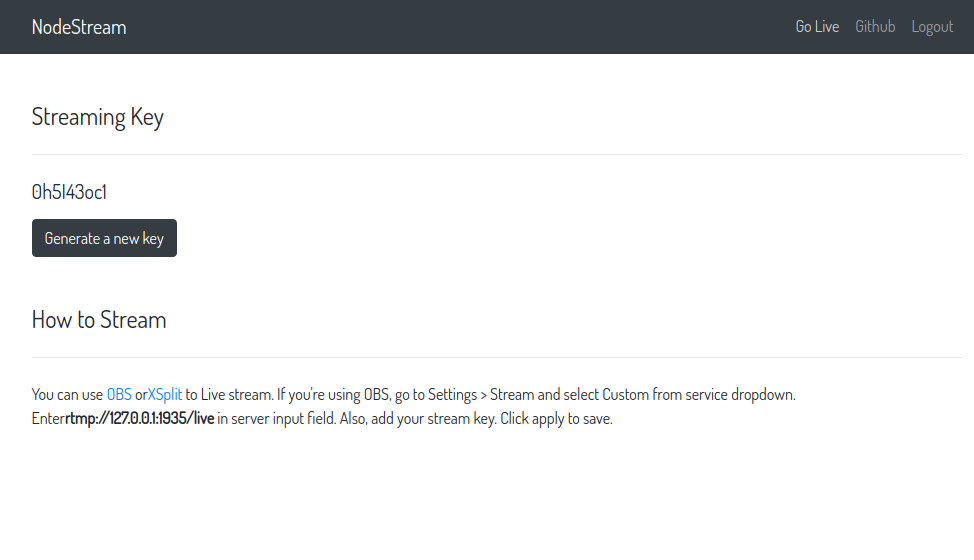
import React from 'react'; import axios from 'axios'; export default class Navbar extends React.Component { constructor(props){ super(props); this.state = { stream_key : '' }; this.generateStreamKey = this.generateStreamKey.bind(this); } componentDidMount() { this.getStreamKey(); } generateStreamKey(e){ axios.post('/settings/stream_key') .then(res => { this.setState({ stream_key : res.data.stream_key }); }) } getStreamKey(){ axios.get('/settings/stream_key') .then(res => { this.setState({ stream_key : res.data.stream_key }); }) } render() { return ( <React.Fragment> <div className="container mt-5"> <h4>Streaming Key</h4> <hr className="my-4"/> <div className="col-xs-12 col-sm-12 col-md-8 col-lg-6"> <div className="row"> <h5>{this.state.stream_key}</h5> </div> <div className="row"> <button className="btn btn-dark mt-2" onClick={this.generateStreamKey}> Generate a new key </button> </div> </div> </div> <div className="container mt-5"> <h4>How to Stream</h4> <hr className="my-4"/> <div className="col-12"> <div className="row"> <p> You can use <a target="_blank" href="https://obsproject.com/">OBS</a> or <a target="_blank" href="https://www.xsplit.com/">XSplit</a> to Live stream. If you're using OBS, go to Settings > Stream and select Custom from service dropdown. Enter <b>rtmp://127.0.0.1:1935/live</b> in server input field. Also, add your stream key. Click apply to save. </p> </div> </div> </div> </React.Fragment> ) } } |
Inside our passport’s local strategy, when a user successfully registers, we create a new user record with a unique streaming key. If a user visits /settings route, they will be able to view their existing key. When components mounts, we make an XHR call to the backend to retrieve user’s existing streaming key and render it inside our <Settings/> component.
Users can generate a new key by clicking Generate a new key button which makes an XHR call to the backend to create a new key, save it to user collection and also return it so that it can be rendered inside the component. We need to define both GET and POST /settings/stream_key routes. Create a server/routes/settings.js file and add the following code.
|
1 2 3 4 5 6 7 8 9 10 11 12 13 14 15 16 17 18 19 20 21 22 23 24 25 26 27 28 29 30 31 32 33 34 35 36 37 38 39 |
const express = require('express'), router = express.Router(), User = require('../database/Schema').User, shortid = require('shortid'); router.get('/stream_key', require('connect-ensure-login').ensureLoggedIn(), (req, res) => { User.findOne({email: req.user.email}, (err, user) => { if (!err) { res.json({ stream_key: user.stream_key }) } }); }); router.post('/stream_key', require('connect-ensure-login').ensureLoggedIn(), (req, res) => { User.findOneAndUpdate({ email: req.user.email }, { stream_key: shortid.generate() }, { upsert: true, new: true, }, (err, user) => { if (!err) { res.json({ stream_key: user.stream_key }) } }); }); module.exports = router; |
We using shortid module for generating unique strings. Register these routes in the app.js file.
|
1 |
app.use('/settings', require('./routes/settings')); |
Generating Live Stream Thumbnails
In <LiveStreams/> components, we are displaying thumbnail images for live streams.
|
1 2 3 4 5 6 7 8 9 10 11 12 13 14 15 16 17 18 19 20 21 22 23 24 25 26 27 28 29 30 31 |
render() { let streams = this.state.live_streams.map((stream, index) => { return ( <div className="stream col-xs-12 col-sm-12 col-md-3 col-lg-4" key={index}> <span className="live-label">LIVE</span> <Link to={'/stream/' + stream.username}> <div className="stream-thumbnail"> <img src={'/thumbnails/' + stream.stream_key + '.png'}/> </div> </Link> <span className="username"> <Link to={'/stream/' + stream.username}> {stream.username} </Link> </span> </div> ); }); return ( <div className="container mt-5"> <h4>Live Streams</h4> <hr className="my-4"/> <div className="streams row"> {streams} </div> </div> ) } |
We will be generating these thumbnails whenever a new stream connects to our server. We will run a cron job to generate new thumbnails for live streams every 5 seconds. Add this helper method inside server/helpers/helpers.js.
|
1 2 3 4 5 6 7 8 9 10 11 12 13 14 15 16 17 18 19 20 21 22 23 |
const spawn = require('child_process').spawn, config = require('../config/default'), cmd = config.rtmp_server.trans.ffmpeg; const generateStreamThumbnail = (stream_key) => { const args = [ '-y', '-i', 'http://127.0.0.1:8888/live/'+stream_key+'/index.m3u8', '-ss', '00:00:01', '-vframes', '1', '-vf', 'scale=-2:300', 'server/thumbnails/'+stream_key+'.png', ]; spawn(cmd, args, { detached: true, stdio: 'ignore' }).unref(); }; module.exports = { generateStreamThumbnail : generateStreamThumbnail }; |
We are passing the streaming key to generateStreamThumbnail. It spawns a detached ffmpeg process to generate thumbnail image from HLS stream. We will call this helper method inside prePublish closure after validating the streaming key.
|
1 2 3 4 5 6 7 8 9 10 11 12 13 14 15 |
nms.on('prePublish', async (id, StreamPath, args) => { let stream_key = getStreamKeyFromStreamPath(StreamPath); console.log('[NodeEvent on prePublish]', `id=${id} StreamPath=${StreamPath} args=${JSON.stringify(args)}`); User.findOne({stream_key: stream_key}, (err, user) => { if (!err) { if (!user) { let session = nms.getSession(id); session.reject(); } else { helpers.generateStreamThumbnail(stream_key); } } }); }); |
To generate fresh thumbnails, we will run a cron job and call this helper method from it.
|
1 2 3 4 5 6 7 8 9 10 11 12 13 14 15 16 17 18 19 20 21 |
const CronJob = require('cron').CronJob, request = require('request'), helpers = require('../helpers/helpers'), config = require('../config/default'), port = config.rtmp_server.http.port; const job = new CronJob('*/5 * * * * *', function () { request .get('http://127.0.0.1:' + port + '/api/streams', function (error, response, body) { let streams = JSON.parse(body); if (typeof (streams['live'] !== undefined)) { let live_streams = streams['live']; for (let stream in live_streams) { if (!live_streams.hasOwnProperty(stream)) continue; helpers.generateStreamThumbnail(stream); } } }); }, null, true); module.exports = job; |
This cron job will execute every 5 seconds, retrieve active streams from NMS API and generate thumbnails for each stream using the streaming key. Import this job inside the app.js file and run it.
|
1 2 3 4 5 |
// Add import at the start of file const thumbnail_generator = require('./cron/thumbnails'); // Call start method at the end of file thumbnail_generator.start(); |
Our real-time live streaming app is ready. I might have missed some details in this tutorial, but you can access complete code in this repository. If you run into an issue, please report it by creating a new issue in the repository so that it can be addressed. Setup and usage instructions are available in the repository’s readme file.
Here’s a demo of our app.
This blog is impressive specially for beginners .The whole bunch is gathered in a single page 👍👍👍
Hey, i have rtsp and http streams of Ip cameras,i am able to view them using websockets but that is causing delay in video. Can you suggest me what to do.
Hello Ayushi . are you able to stream your ip camera’s video to your website?
Yes. You want too.
Hi Ayushi, could you help me with that? I need to make a simple page where i can live stream from rtsp url in reactjs. Im unable to solve it. Please and thank youp
Hi Ayushi,
I have same kind of requirement.
Can you help me out ?
Thanks
Hello – will this work for multicast UDP to be streamed to the browser? UDP could be converted to HLS or http?
Thanks.
Thank you for this guide!
Can you tell me about performance of your approach? ex: 1000 active user per second
I got as far as ‘Create media_server.js file’, which doesn’t tell me where to put it.
Then it seems like it’s supposed to allow OBS to connect? But I don’t even see a webserver being started?
This guide looked promising, but maybe it’s over my head. I’m used to making simple pages on apache2 servers. Any better guides than this?
Also get some errors from npm about dependencies being missing. And not everything this guide requested I install even exists.
OS: Debian 9
I followed the instructions and could never get the streams to show up. I thought maybe I did an incorrect step. So I downloaded the git repo and started it up with the same outcome. The Server is receiving the stream, but the playable live stream never appears under “Live Streams” I just get a blank page.
I’m looking into possibility of making OBS-like software using Electron. Would this kind of thing theoretically be possible with minimum involvement of C++ coding for node?
I’m currently researching possibilities with screen/window/directshow captures using ffmpeg and mixing multiple video streams into one.
Back in 2018, I built a snipping tool with Electron and wrote about it in this post. I used Electron’s desktopCapturer API. It gives your a video/audio stream that you can process according to your needs.
I was trying to deploy to Heroku a working alike version of your application. It actually renders the page without css styling and with the following error: Uncaught SyntaxError: Unexpected token ‘<'. When I click Login button page goes white and nothing else happens. Do you know how to make it work?
Have you installed npm packages and build code? Install and build instructions are available in the repository.
Thanks, I eventually configured it a little bit different and got it working on Heroku. I have a client listeing to port 3000 with create-react-app, and my server listening to the same port as your source code: 3333. I get to se the livestreams thumbnails. I didn’t use the ejs engine template as I had everything going on in my react front end. However the only problem that I have is that when I click in a thumbnail image, it takes me to the VideoPlayer component, but the page is in blank, and in the console I get the following error:
GET http://localhost:8888/live/Uv8HUwMU/index.m3u8 404 (Not Found)
I’ve checked the whole repo, and I left the server part that has to do with the streaming the same. But I don’t know what’s wrong. If you could give me a hint, I would be very much greatful. Best.
Nevermind. It works perfectly in localhost. Only problem is, Heroku seems to block port 1935 and it obs fails to even connect to heroku.
@Diego Salas heroku will provide you a dynamic port in env.PORT variable, use that instead of hardcoding 1935 port like this.
const port = env.PORT || 1935;
please can i have a look at your code, i am also trying to deploy to heroku and am having issues with the path to the ffmpeg even though i have add ffmpeg as a buildpack
Hi Diego,
Do you have a tutorial how you got this to work on Heroku please ?
Thanks
Love the project; it works as intended! Is there a possibility of having a Public Page with all of the stream listed, but that does not require to login or register? Perhaps, the public page can be on a different port than 3333…
You can try my fork. I make a little change make it possible to custom ip easily
https://github.com/eMUQI/node-stream
This was almost a good guide, but not sure why the stream is not working and OBS and this guide don’t help much in the realm of troubleshooting.
Looks nice, but based on commits from repo and the steps made with no explanation this guide is best for those who are familiar with every line of code used and not so much for new people.
Hi, I tring, but it apper an error:
[rtmp play] Stream not found. id=31MPQJFQ streamPath=/live/ streamId=1
How to fix this?
Hi,
Congratulations and thanks for your work.
I’m trying to run it on the computer. I would fix some mistakes. But ffmpeg does not start. I couldn’t fix this error. I am reviewing the codes. but I couldn’t find using require (‘@ ffmpeg-installer / ffmpeg’) section. Can you give an idea?
Thanks.
I created everything just right. In the first test everything went well with the obs connecting, but then it is connecting and disconnecting automatically and infinitely
Great post, had no issues setting up following the tutorial and cross referencing your github repo for it. Thank you!
hello i have this error : (node:73404) UnhandledPromiseRejectionWarning: Error: spawn /usr/local/Cellar/ffmpeg EACCES
could you help me ?
thx
Hello great tutorial thatk you it works perfect on localhost but if i but in real server (ubuntu nginx) it creates the folder under live with stream_key but wont create any file inside it OBS wont fail and log from server noting special idk whats wrong any idea ? ffmpeg ver 4.3-2
This blog post was really helpful, I was able to create a live stream server for my NGO.
I will like to know how to scale the live streaming to support more users on a Digital Ocean Droplet (Say up to 2000 users at a time)
Hi Waleed, Do you have a Tutorial on how to deploy this to Heroku please ?
Kevin
Pretty good tutorial,
But how to protect the stream from reading?
So only registered / paid subscription users can watch it.
Thanks.
On the audience route to the livestream, just make sure the loggedInUser() function is called. (I feel like I saw it in there, if it wasn’t that route, it was the redirect after login… do the same thing). I’m about to fork this and toy around. I’ll update with my findings.
please help me in creating webRTC to RTMP Streaming App.