In this tutorial, we’re building a Facebook messenger chatbot that will respond to users with images of cute cats and dogs. We’ll call it Aww Bot. We need to create a Facebook page for our bot to give it an identity. Our page visitors will be able to interact with it and it will respond to them.
Getting Started
Let’s start by creating a Facebook page, give it a name and username. Also, create a Facebook app and add a Messenger product. Go to your app settings and choose your page from the drop-down in Token Generation settings. It will ask your permissions and generate a page access token for you. Our bot will use this token to make calls to Facebook messenger API to respond to users.
Setting up WebServer
We’re using Expressjs to run an HTTP server. Run npm install express body-parser request config --save. Add this code to your index.js file to run a basic HTTP server.
|
1 2 3 4 5 6 7 8 9 10 11 |
'use strict'; let express = require('express'), bodyParser = require('body-parser'), app = express(); app.use(bodyParser.urlencoded({ extended: false })); app.use(bodyParser.json()); app.listen(8989, () => console.log('Example app listening on port 8989!')); app.get('/', (req, res) => res.send('Hello World!')); |
Now if you visit http://127.0.0.1:8989 in your browser, you’ll see a Hello World! response.
Workaround for HTTPS
Before moving on to WebHooks, we need to configure HTTPS for our dev environment. Messenger won’t accept your WebHook URL if you’re using a self-signed SSL certificate. The only way to get a free trusted signed certificate is to use Letsencrypt. Letencrypt only issues certificates to domains and not IP addresses. Instead, we’ll use ngrok to expose our local dev environment through NAT and access it from ngrok public HTTPS URL.
Setup ngrok
Setting up ngrok is easy. All you have to do is to download a zipped binary from their site, unzip and run it. Run
./ngrok http 80
to expose your HTTP port. Make sure you forward port 80 to 8989 in your router WAN settings. ngrok will generate a public HTTP and HTTPS URL for your local dev environment.
Creating WebHooks
Messenger uses WebHooks to authenticate and pass event data to our application. They are simple HTTP callbacks that will receive incoming events data like received messages from messenger bot. We’ll use Node.js body parsing module to parse out data from GET and POST requests. Now add this route to your application to handle WebHook verification request.
|
1 2 3 4 5 6 7 8 9 10 11 12 13 14 15 16 17 18 19 20 21 22 23 24 25 26 27 |
// Adds support for GET requests to our webhook app.get('/webhook', (req, res) => { // Your verify token. Should be a random string. let VERIFY_TOKEN = "SOMETHING_RANDOM"; // Parse the query params let mode = req.query['hub.mode']; let token = req.query['hub.verify_token']; let challenge = req.query['hub.challenge']; // Checks if a token and mode is in the query string of the request if (mode && token) { // Checks the mode and token sent is correct if (mode === 'subscribe' && token === VERIFY_TOKEN) { // Responds with the challenge token from the request console.log('WEBHOOK_VERIFIED'); res.status(200).send(challenge); } else { // Responds with '403 Forbidden' if verify tokens do not match res.sendStatus(403); } } }); |
Now open Messenger product settings and setup WebHook for your application. Copy your ngrok HTTPS URL and paste it in Callback URL. Paste your randomly generated VERIFY_TOKEN in Verify Token field. You should be able to verify and save it if your WebHook is accessible and your verification token matches with the one in your code.
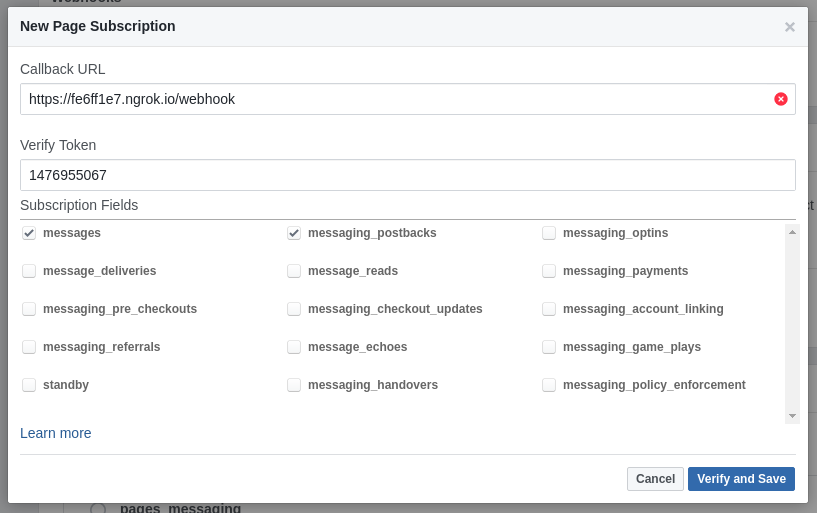
After saving, select your page from the drop-down to subscribe your webhook to the page events.
Now create a post webhook route to handling post events from messenger app. Add following code to your application.
|
1 2 3 4 5 6 7 8 9 10 11 12 13 14 15 16 17 18 19 20 21 22 23 24 25 26 27 28 29 30 31 32 33 34 35 36 |
// Creates the endpoint for our webhook app.post('/webhook', (req, res) => { let body = req.body; if (body.object === 'page') { // Iterates over each entry - there may be multiple if batched body.entry.forEach(function(entry) { // Gets the message. entry.messaging is an array, but // will only ever contain one message, so we get index 0 let webhook_event = entry.messaging[0]; console.log(webhook_event); // Get the sender PSID let sender_psid = webhook_event.sender.id; console.log('Sender PSID: ' + sender_psid); // Check if the event is a message or postback and // pass the event to the appropriate handler function if (webhook_event.message) { console.log(webhook_event.message) } else if (webhook_event.postback) { console.log(webhook_event.postback) } }); // Returns a '200 OK' response to all requests res.status(200).send('EVENT_RECEIVED'); } else { // Returns a '404 Not Found' if event is not from a page subscription res.sendStatus(404); } }); |
We’ve configured our app to handle two types of events to our webhook events, messages, and postback. To test your webhook, open messenger and send a message to your page. You’ll see PSID of the sender and web_event logged to console along with the payload. Now we’ll write handlers to handle these events.
|
1 2 3 4 5 6 7 8 9 10 11 12 13 14 15 16 17 18 19 20 |
// Handles messages events const handleMessage = (sender_psid, received_message) => { let response; if (received_message.text) { } } // const handlePostback = (sender_psid, received_postback) => { let response; // Get the payload for the postback let payload = received_postback.payload; if(payload === 'GET_STARTED'){ } } |
handleMessage() method will handle incoming messages and handlePostback() method will handle incoming postbacks. Update your webhook and call these methods.
|
1 2 3 4 5 6 7 |
// Check if the event is a message or postback and // pass the event to the appropriate handler function if (webhook_event.message) { handleMessage(sender_psid, webhook_event.message); } else if (webhook_event.postback) { handlePostback(sender_psid, webhook_event.postback); } |
Whenever we’ll receive a message or postback, data will be passed to these handlers along with the PSID of the sender.
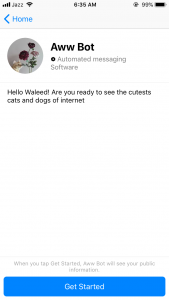
Configuring Welcome Screen and Get Started Postback Event
When a new user starts a conversation with Messenger bot, it shows them a Get Started button. We can configure a custom postback event for it. We can use this get started postback to tell the user about our bot and how they can interact with it. To set a custom greeting for your page run this curl command from your terminal.
|
1 2 3 4 5 6 7 8 |
curl -X POST -H "Content-Type: application/json" -d '{ "greeting": [ { "locale":"default", "text":"Hello {{user_first_name}}! Are you ready to see the cutests cats and dogs" } ] }' "https://graph.facebook.com/v2.6/me/messenger_profile?access_token=YOUR_PAGE_ACCESS_TOKEN" |
We’re configuring Aww Bot to show this message to users asking them if they are ready to see the cutest cats and dogs? To set a custom postback run this command from your terminal.
|
1 2 3 |
curl -X POST -H "Content-Type: application/json" -d '{ "get_started": {"payload": "GET_STARTED"} }' "https://graph.facebook.com/v2.6/me/messenger_profile?access_token=YOUR_PAGE_ACCESS_TOKEN" |
App Configuration
We’re using config npm module to store page access token in a separate config file. Create a config directory in your project. Also, create a default.json file in it.
|
1 2 3 4 5 6 7 |
{ "facebook": { "page": { "access_token": "PAGE_ACCESS_TOKEN" } } } |
Add your page access token to config and add this file to .gitignore. We’ll retrieve page access token in callSendAPI() method by calling config.get('facebook.page.access_token').
Handling Get Started Postback Event
|
1 2 3 4 5 6 7 8 9 10 11 |
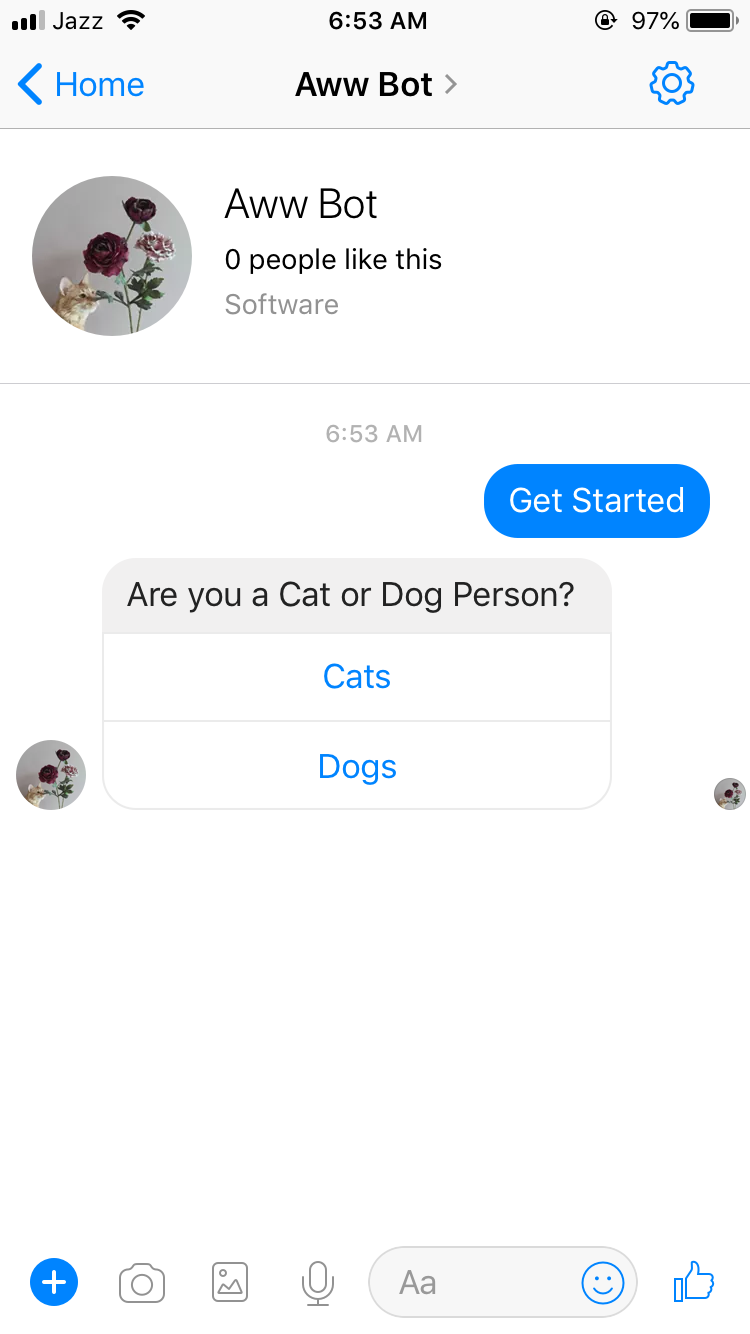
const handlePostback = (sender_psid, received_postback) => { let response; // Get the payload for the postback let payload = received_postback.payload; if(payload === 'GET_STARTED'){ response = askTemplate('Are you a Cat or Dog Person?'); callSendAPI(sender_psid, response); } } |
We’ll write a method askTempate() that will return a valid response object for our messenger API. callSendAPI() will send that message template to the user. Add these methods to your app.
|
1 2 3 4 5 6 7 8 9 10 11 12 13 14 15 16 17 18 19 20 21 22 23 24 25 26 27 28 29 30 31 32 33 34 35 36 37 38 39 40 41 42 43 44 45 46 47 48 49 50 |
const askTemplate = (text) => { return { "attachment":{ "type":"template", "payload":{ "template_type":"button", "text": text, "buttons":[ { "type":"postback", "title":"Cats", "payload":"CAT_PICS" }, { "type":"postback", "title":"Dogs", "payload":"DOG_PICS" } ] } } } } // Sends response messages via the Send API const callSendAPI = (sender_psid, response, cb = null) => { // Construct the message body let request_body = { "recipient": { "id": sender_psid }, "message": response }; // Send the HTTP request to the Messenger Platform request({ "uri": "https://graph.facebook.com/v2.6/me/messages", "qs": { "access_token": config.get('facebook.page.access_token') }, "method": "POST", "json": request_body }, (err, res, body) => { if (!err) { if(cb){ cb(); } } else { console.error("Unable to send message:" + err); } }); } |
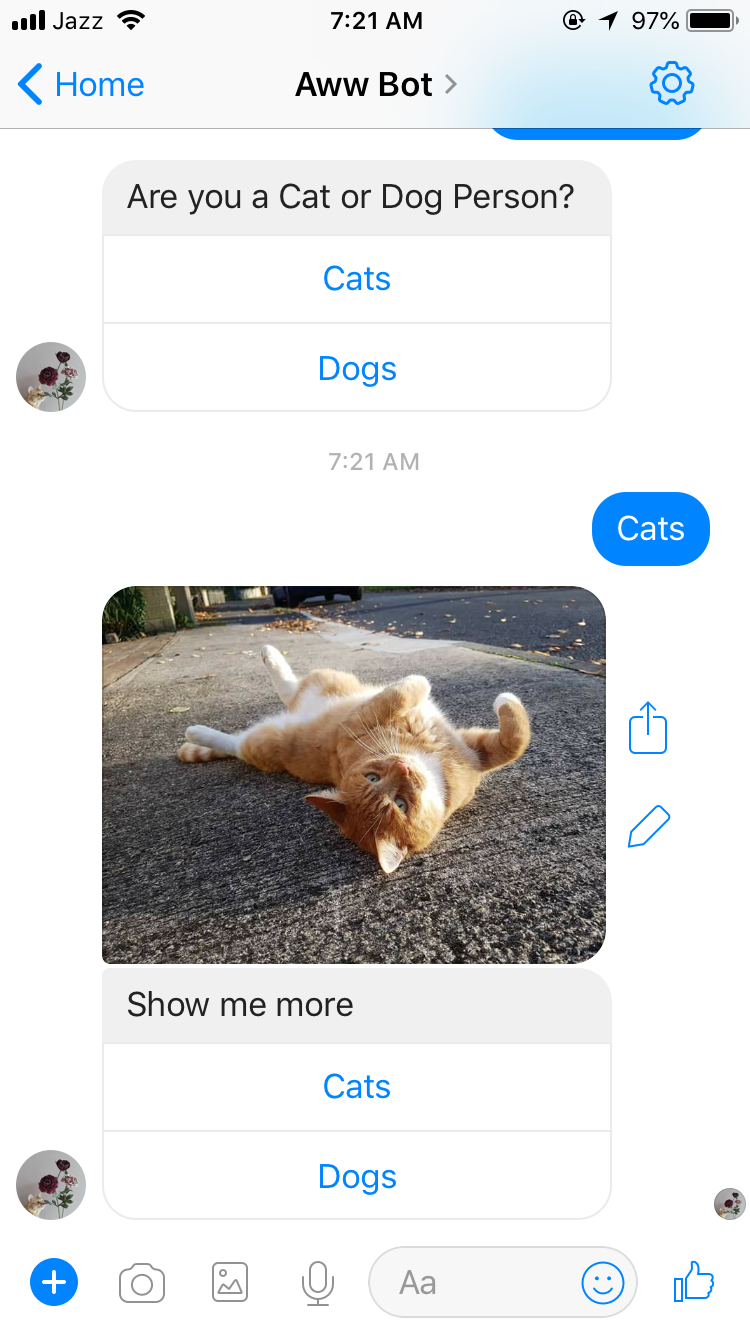
We’ll send our user a message with two buttons with custom postback payload. When they will select an option, a postback event will be sent back to our webhook and we’ll handle them within our event handlers.
Handling Custom Postback Events
Update your postback handler function with this code.
|
1 2 3 4 5 6 7 8 9 10 11 12 13 14 15 16 17 18 19 20 21 22 23 |
const handlePostback = (sender_psid, received_postback) => { let response; // Get the payload for the postback let payload = received_postback.payload; // Set the response based on the postback payload if (payload === 'CAT_PICS') { response = imageTemplate('cats', sender_psid); callSendAPI(sender_psid, response, function(){ callSendAPI(sender_psid, askTemplate('Show me more')); }); } else if (payload === 'DOG_PICS') { response = imageTemplate('dogs', sender_psid); callSendAPI(sender_psid, response, function(){ callSendAPI(sender_psid, askTemplate('Show me more')); }); } else if(payload === 'GET_STARTED'){ response = askTemplate('Are you a Cat or Dog Person?'); callSendAPI(sender_psid, response); } // Send the message to acknowledge the postback } |
When a user will click on Cats option, our webhook will receive a postback event with CAT_PICS payload. Dogs option will send back a postback with DOG_PICS payload. We’ve added another method imageTemplate() that will return an image template with an image URI of a cat or dog.
Creating a Mock API
Let’s create a mock API to return images of cats and dogs for our image template. Create a pics.js file and add this code to it.
|
1 2 3 4 5 6 7 8 9 10 11 12 13 14 15 16 17 18 19 20 21 22 23 24 25 26 27 28 29 30 |
module.exports = { cats : [ 'https://i.imgur.com/Qbg7CeM.jpg', 'https://i.imgur.com/nUzkpJY.jpg', 'https://i.imgur.com/NpDcKph.jpg', 'https://i.imgur.com/oJtSDaO.jpg', 'https://i.redd.it/82ajpsrd17111.jpg', 'https://i.redd.it/00km1d2rt0111.jpg', 'https://i.redd.it/rdbavhp0y7111.jpg', 'https://i.redd.it/5hn3mg0n98111.jpg', 'https://i.redd.it/d23pb8mta6111.jpg', 'https://i.redd.it/d2gyrwgy7oz01.jpg', 'https://i.redd.it/z4sgl84q72z01.jpg', 'https://i.redd.it/wvykzo8n1cy01.jpg' ], dogs : [ 'https://i.redd.it/6tjihi2qe7111.jpg', 'https://i.imgur.com/etRCs56.jpg', 'https://i.redd.it/nibw50f8y4111.jpg', 'https://i.redd.it/izcvnvj1o7111.jpg', 'https://i.redd.it/eqs1g9dldz011.jpg', 'https://i.redd.it/civ9dnu9u1111.jpg', 'https://i.redd.it/kk03qwclkp011.jpg', 'https://i.redd.it/2694pupjne011.jpg', 'https://i.redd.it/qk49ls5y6oy01.jpg', 'https://i.imgur.com/oM3mKgB.jpg', 'https://i.redd.it/8kx2riaulux01.jpg' ] }; |
Now require it in your app.
images = require('./pics');
Add this method to return image template.
|
1 2 3 4 5 6 7 8 9 10 11 |
const = imageTemplate(type, sender_id) => { return { "attachment":{ "type":"image", "payload":{ "url": getImage(type, sender_id), "is_reusable":true } } } } |
We’ll iteratively retrieve images from the array and send them to requesting user until we run out of images. We’ll start the count from 0 in case we run out of images. Add this method to keep a record of requesting users.
|
1 2 3 4 5 6 7 8 9 10 11 12 13 14 15 16 17 18 19 20 21 22 23 24 25 26 27 28 29 30 |
let users = {}; const = getImage(type, sender_id) => { // create user if doesn't exist if(users[sender_id] === undefined){ users = Object.assign({ [sender_id] : { 'cats_count' : 0, 'dogs_count' : 0 } }, users); } let count = images[type].length, // total available images by type user = users[sender_id], // // user requesting image user_type_count = user[type+'_count']; // update user before returning image let updated_user = { [sender_id] : Object.assign(user, { [type+'_count'] : count === user_type_count + 1 ? 0 : user_type_count + 1 }) }; // update users users = Object.assign(users, updated_user); console.log(users); return images[type][user_type_count]; } |
We’ll store every user’s PSID in users object as a key. If it doesn’t exist, we’ll create a new user. We’ll update count of user object every time a user requests an image of a cat or dog. We’ll then return an absolute path to the image which will be used in the image template. We’ll send image template as a response to Cat and Dog button postbacks.
|
1 2 3 4 5 6 7 8 9 10 11 12 13 14 15 |
// Set the response based on the postback payload if (payload === 'CAT_PICS') { response = imageTemplate('cats', sender_psid); callSendAPI(sender_psid, response, function(){ callSendAPI(sender_psid, askTemplate('Show me more')); }); } else if (payload === 'DOG_PICS') { response = imageTemplate('dogs', sender_psid); callSendAPI(sender_psid, response, function(){ callSendAPI(sender_psid, askTemplate('Show me more')); }); } else if(payload === 'GET_STARTED'){ response = askTemplate('Are you a Cat or Dog Person?'); callSendAPI(sender_psid, response); } |
We’re also passing a callback to callSendAPI() method to send ask template after sending them an image. On success, we’ll invoke this callback, which will send user an ask template. We’re doing this because of asynchronous nature of callbacks, we’re making sure that user receives ask template after receiving an image.
I’ve created a Github repository for you guys. If you are getting any errors, please mention them in comments. Read Github repository readme.md file for instructions on how to install and configure it. To make your messenger bot accessible to everyone, your Facebook apps need to be approved. If your app is not approved, your bot will only be accessible to administrators and testers of your app.
Here’s a working demo of Aww Bot.
Nice and informative post thanks for sharing…..
hi this is great 🙂 . but I am following you at the moment.
I have a problem.
I tried to greet welcome message such as below
curl -X POST -H “Content-Type: application/json” -d ‘{
“get_started”: {“payload”: “GET_STARTED”}
}’ “https://graph.facebook.com/v2.6/me/messenger_profile?access_token=myaccesstoken
I got this message
{“error”:{“message”:”Unsupported post request. Object with ID ‘me’ does not exist, cannot be loaded due to missing permissions, or does not support this operation. Please read the Graph API documentation at https:\/\/developers.facebook.com\/docs\/graph-api”,”type”:”GraphMethodException”,”code”:100,”error_subcode”:33,”fbtrace_id”:”AXnPdRl+qyf”}}
What should I do?
Thankyou so much
I fixed ny myself
thx 🙂
Hey Maggie ,
How did you fixed this error . As I am getting same error but couldn’t able to solve it .
Can you please guide me the fixing steps.
Can we make http request to external api.
Thanks for the tutorial
minor error above
const askTemplate …blah….
should be
function askTemplate …blah….
similarly
const callSendAPI
should be a function
the git repo is correct
Thanks for writing this.
hung up with not able to see output of function askTemplate(text)
as in : I never see the Cat or Dog buttons appear.
have been adding console.log outputs to trace progress.
Awesome post! this was really helped for someone like myself!!
Hi, I don’t know how to “Configuring Welcome Screen and Get Started Postback Event” in node.js coding. Can we setting the Welcome Screen in index.js?
Can you give an example?
Thanks
Can you please guide on how to open “Messenger product settings”? I am not able to find that option.